Howdy Godotters! It’s been more than a year since I last wrote on this blog, “… blah blah, blah blah, blah” (cf. C. L. C. Chuckie), and with Godot 4.0 nearing release, it’s time to write something to jumpstart you into creating your own multiplayer experience with Godot.
Since the last blog post, we rewrote the scene replication API to be more user-friendly, adding two “configuration” nodes:
- The
MultiplayerSpawnernode to configure where nodes can be remotely instantiated by which peer. - The
MultiplayerSynchronizernode to configure which node properties can be synchronized by which peer.
So, without further ado let’s see how to create a simple multiplayer game using these new features (jump to the bottom for the full project).
Scene setup
First of all, let’s setup our multiplayer scene:
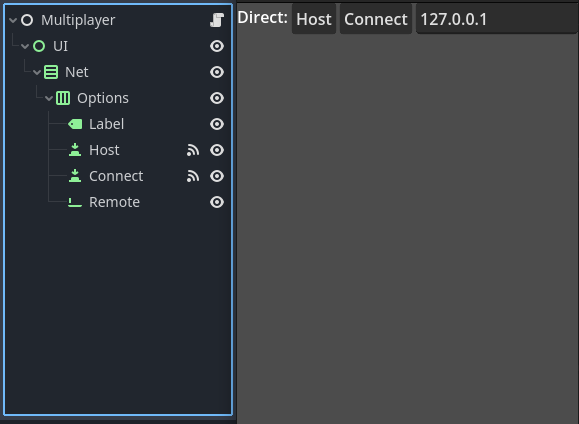
And wire up the signals to start a server or client:
# multiplayer.gd
extends Node

const PORT = 4433

func _ready():
	# Start paused.
	get_tree().paused = true
	# You can save bandwidth by disabling server relay and peer notifications.
	multiplayer.server_relay = false

	# Automatically start the server in headless mode.
	if DisplayServer.get_name() == "headless":
		print("Automatically starting dedicated server.")
		_on_host_pressed.call_deferred()


func _on_host_pressed():
	# Start as server.
	var peer = ENetMultiplayerPeer.new()
	peer.create_server(PORT)
	if peer.get_connection_status() == MultiplayerPeer.CONNECTION_DISCONNECTED:
		OS.alert("Failed to start multiplayer server.")
		return
	multiplayer.multiplayer_peer = peer
	start_game()


func _on_connect_pressed():
	# Start as client.
	var txt : String = $UI/Net/Options/Remote.text
	if txt == "":
		OS.alert("Need a remote to connect to.")
		return
	var peer = ENetMultiplayerPeer.new()
	peer.create_client(txt, PORT)
	if peer.get_connection_status() == MultiplayerPeer.CONNECTION_DISCONNECTED:
		OS.alert("Failed to start multiplayer client.")
		return
	multiplayer.multiplayer_peer = peer
	start_game()


func start_game():
	# Hide the UI and unpause to start the game.
	$UI.hide()
	get_tree().paused = false
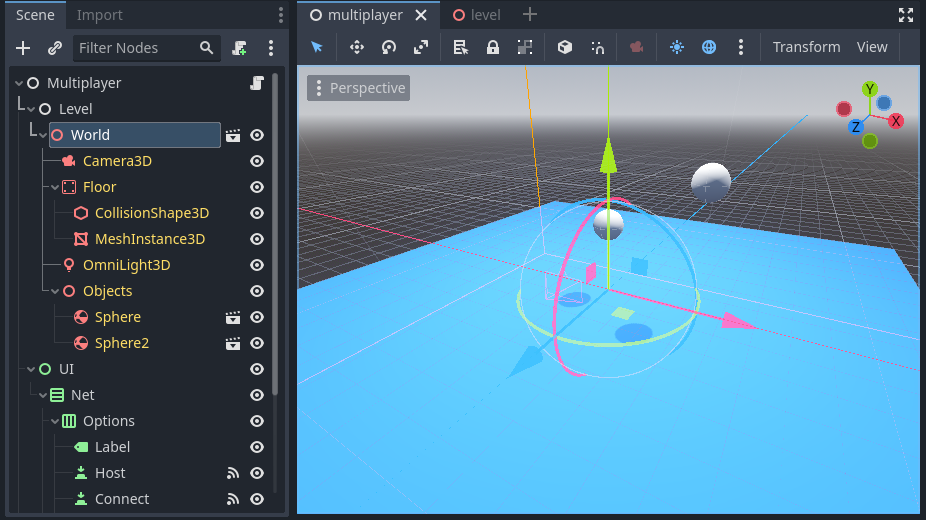
Then setup our world scene with some physics objects, and add it to the multiplayer scene:
Synchronizing properties
So, now that we have our scene set up and peers can connect, let’s add a MultiplayerSynchronizer to our object scene and configure it to sync some of its properties.
Synchronized properties can be configured by selecting them from a list or entering their path.
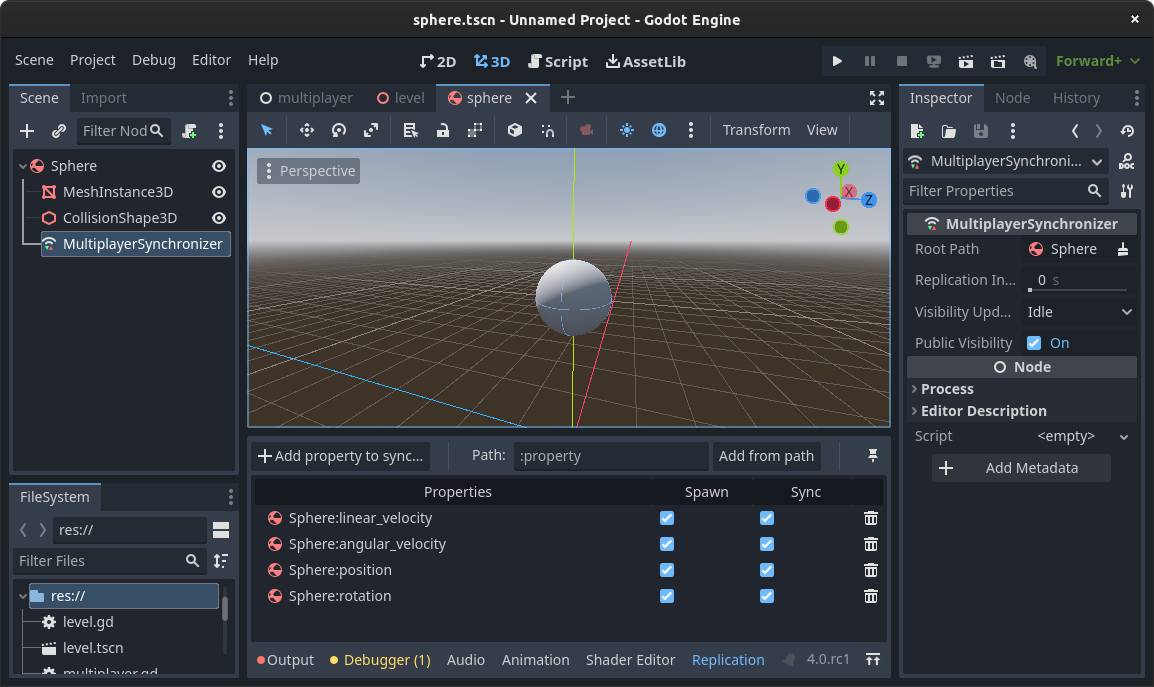
Running the game now you will notice that the objects start synchronizing as soon as the client connects.
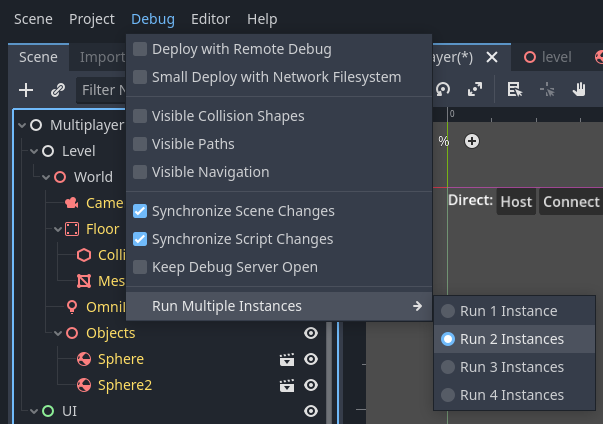
Tip: You can run and debug multiple instances simultaneously from the editor by changing the value in Debug -> Run Multiple Instances.
Spawning and despawning scenes
The MultiplayerSpawner node automates the process of replicating dynamically instantiated nodes across peers, including when joining mid-game or reconnecting.
This mostly boils down to the following MultiplayerSpawner properties:
spawn_path: Defines the path where the spawner will add the nodes it instantiates.Auto Spawn List: Defines the scenes to be automatically replicated when added as a child ofspawn_pathby the authority (server by default).spawn_function: (Optional) Defines a function to be called on all peers when using thespawncustom instantiation method.
You can use the set_multiplayer_authority() method to control which peer is allowed to instantiate scenes via the spawner (the server by default).
Selecting levels
Currently, using get_tree().change_scene_to_packed() (or change_scene_to_file()) during a multiplayer session can be problematic when players join mid-game or re-join a match. While we are working on supporting the change_scene* methods out of the box in future Godot releases, it is currently possible to simulate the behavior using a MultiplayerSpawner to spawn the level scene.
This ensures that if our game needs to change the active level, the appropriate one will also be instantiated on connected clients as well as on newly connected ones.
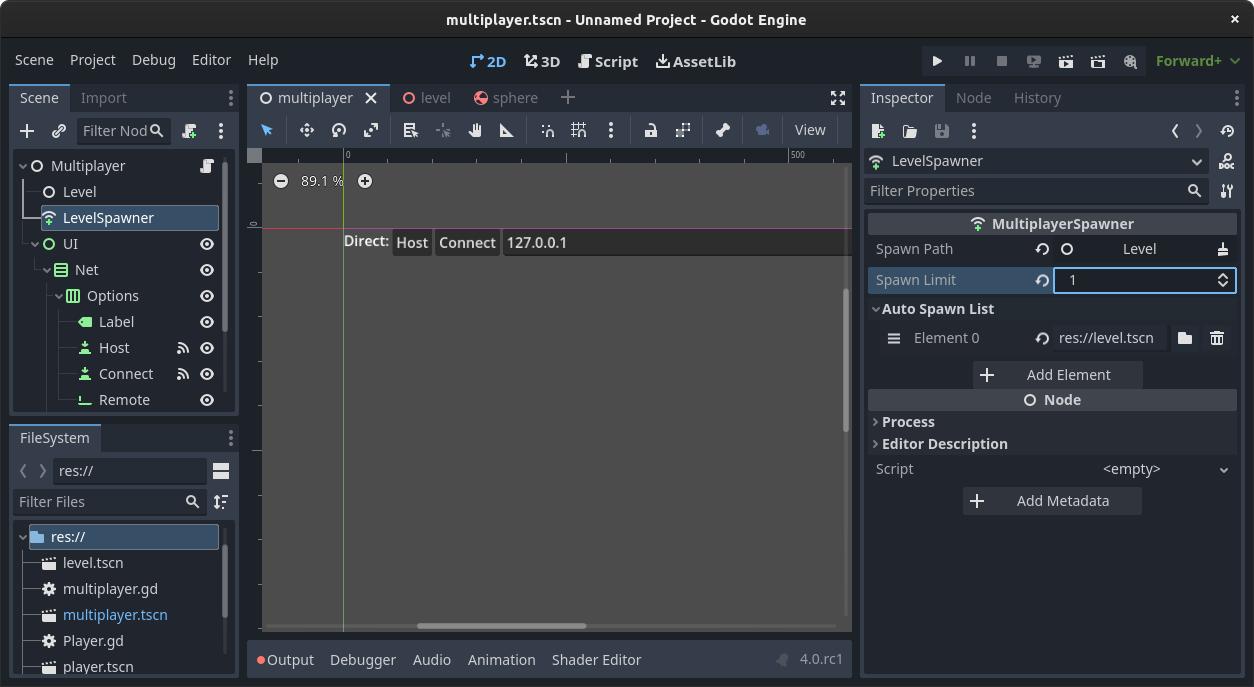
To do that, let’s remove our static world from the multiplayer scene, add a MultiplayerSpawner node, and configure it with our level(s) in the “Auto Spawn List”.
Now let’s add a change_level() function which instantiates the (selected) level and call it from the start_game() function.
func start_game():
	# Hide the UI and unpause to start the game.
	$UI.hide()
	get_tree().paused = false
	# Only change level on the server.
	# Clients will instantiate the level via the spawner.
	if multiplayer.is_server():
		change_level.call_deferred(load("res://level.tscn"))


# Call this function deferred and only on the main authority (server).
func change_level(scene: PackedScene):
	# Remove old level if any.
	var level = $Level
	for c in level.get_children():
		level.remove_child(c)
		c.queue_free()
	# Add new level.
	level.add_child(scene.instantiate())


# The server can restart the level by pressing Home.
func _input(event):
	if not multiplayer.is_server():
		return
	if event.is_action("ui_home") and Input.is_action_just_pressed("ui_home"):
		change_level.call_deferred(load("res://level.tscn"))
Now the level will be instantiated by the server as soon as it starts, and clients will instantiate it as soon as they connect.
The server can also call change_level() at any moment to restart the current level, or to select a different one (as long as the selected level is in the “Auto Spawn List” of all peers).
Additionally, when scenes controlled by a multiplayer spawner contain a multiplayer synchronizer referencing the root node of the scene, the configured “Spawn” properties will be automatically set on remote peers during the spawning process.
Similarly to what we did in the multiplayer scene, we could add one or more MultiplayerSpawner to the level scene to replicate nodes that have a dynamic lifecycle like bullets, powerups, etc.
Tip: You can further customize the number of nodes that can be spawned remotely at any given time via the spawn_limit property. In this case we can set spawn_limit = 1 since only one level is allowed to be active at any given time.
Spawning players
For the player characters we usually need to transfer part of the authority over to the peer which each character represents.
In this scenario it is good practice to use a child node dedicated to the player inputs, and leave the multiplayer authority of the character nodes to the server. This helps maintaining proper isolation between controls and game logic, making the setup less error-prone.
Keeping that in mind, let’s create the player scene with a synchronizer for the character itself, and a synchronizer for the player input.
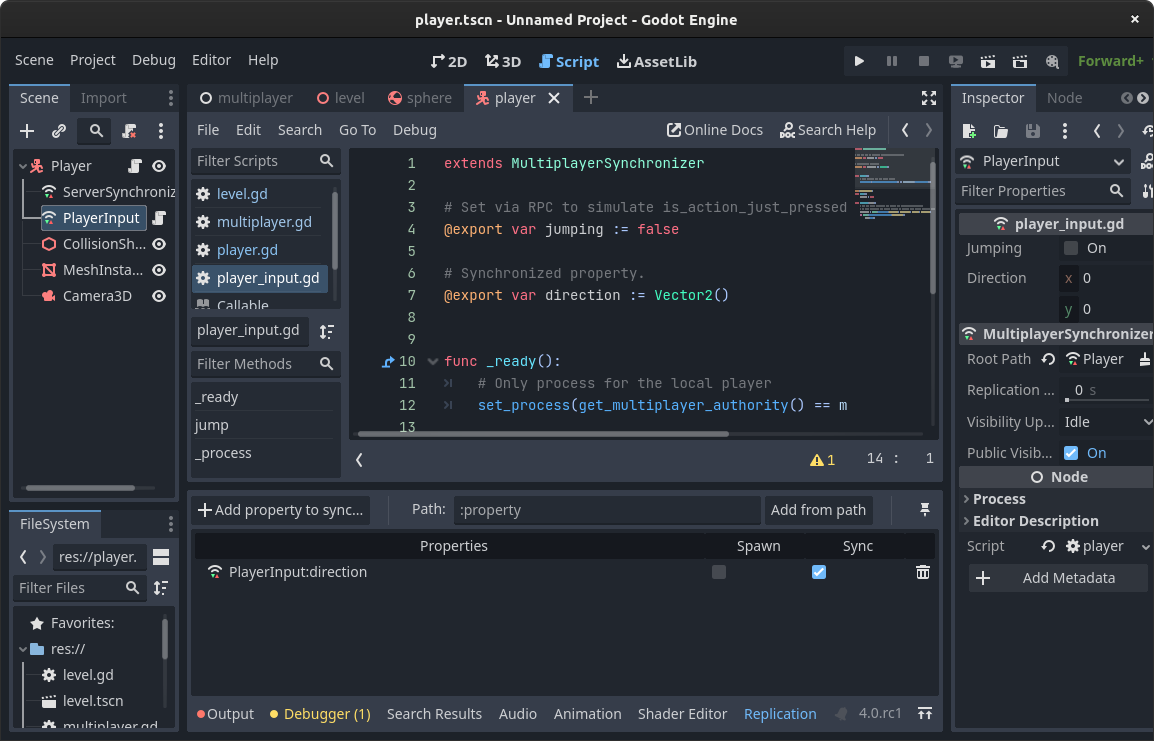
We then attach a script to the player input synchronizer and configure it to gather the local input based on the configured authority.
# player_input.gd
extends MultiplayerSynchronizer

# Set via RPC to simulate is_action_just_pressed.
@export var jumping := false

# Synchronized property.
@export var direction := Vector2()

func _ready():
	# Only process for the local player.
	set_process(get_multiplayer_authority() == multiplayer.get_unique_id())


@rpc("call_local")
func jump():
	jumping = true


func _process(delta):
	# Get the input direction and handle the movement/deceleration.
	# As good practice, you should replace UI actions with custom gameplay actions.
	direction = Input.get_vector("ui_left", "ui_right", "ui_up", "ui_down")
	if Input.is_action_just_pressed("ui_accept"):
		jump.rpc()
We handle jumping with a reliable RPC (we don’t want to miss the player jumping action!), while we use the synchronizer itself to constantly sync the direction the user wants to go.
We can then move the player character on the main authority by reading the synchronized input state:
# player.gd
extends CharacterBody3D

const SPEED = 5.0
const JUMP_VELOCITY = 4.5

# Get the gravity from the project settings to be synced with RigidBody nodes.
var gravity = ProjectSettings.get_setting("physics/3d/default_gravity")

# Set by the authority, synchronized on spawn.
@export var player := 1 :
	set(id):
		player = id
		# Give authority over the player input to the appropriate peer.
		$PlayerInput.set_multiplayer_authority(id)

# Player synchronized input.
@onready var input = $PlayerInput

func _ready():
	# Set the camera as current if we are this player.
	if player == multiplayer.get_unique_id():
		$Camera3D.current = true
	# Only process on server.
	# EDIT: Let the client simulate player movement too to compesate network input latency.
	# set_physics_process(multiplayer.is_server())


func _physics_process(delta):
	# Add the gravity.
	if not is_on_floor():
		velocity.y -= gravity * delta

	# Handle jump.
	if input.jumping and is_on_floor():
		velocity.y = JUMP_VELOCITY

	# Reset jump state.
	input.jumping = false

	# Handle movement.
	var direction = (transform.basis * Vector3(input.direction.x, 0, input.direction.y)).normalized()
	if direction:
		velocity.x = direction.x * SPEED
		velocity.z = direction.z * SPEED
	else:
		velocity.x = move_toward(velocity.x, 0, SPEED)
		velocity.z = move_toward(velocity.z, 0, SPEED)

	move_and_slide()
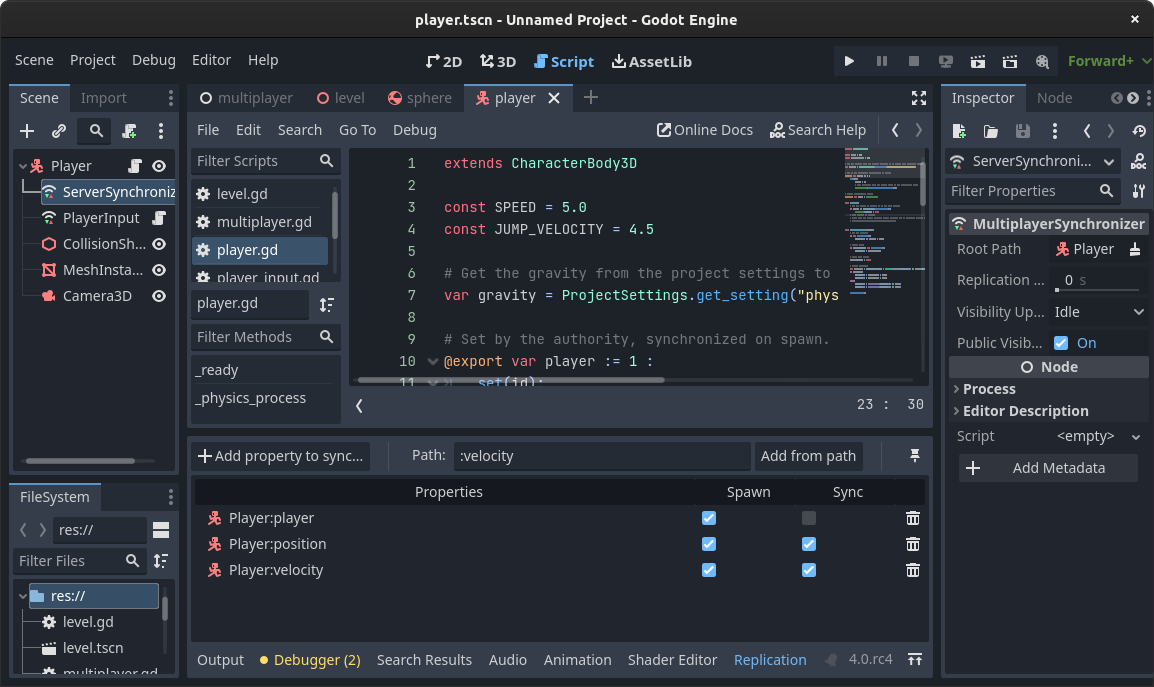
We will then use the server synchronizer to keep the position and velocity in sync and to set the player id on spawn (which will in turn configure the appropriate input authority).
Finally, we can add a multiplayer spawner to our level, and use it to spawn players as they connect.
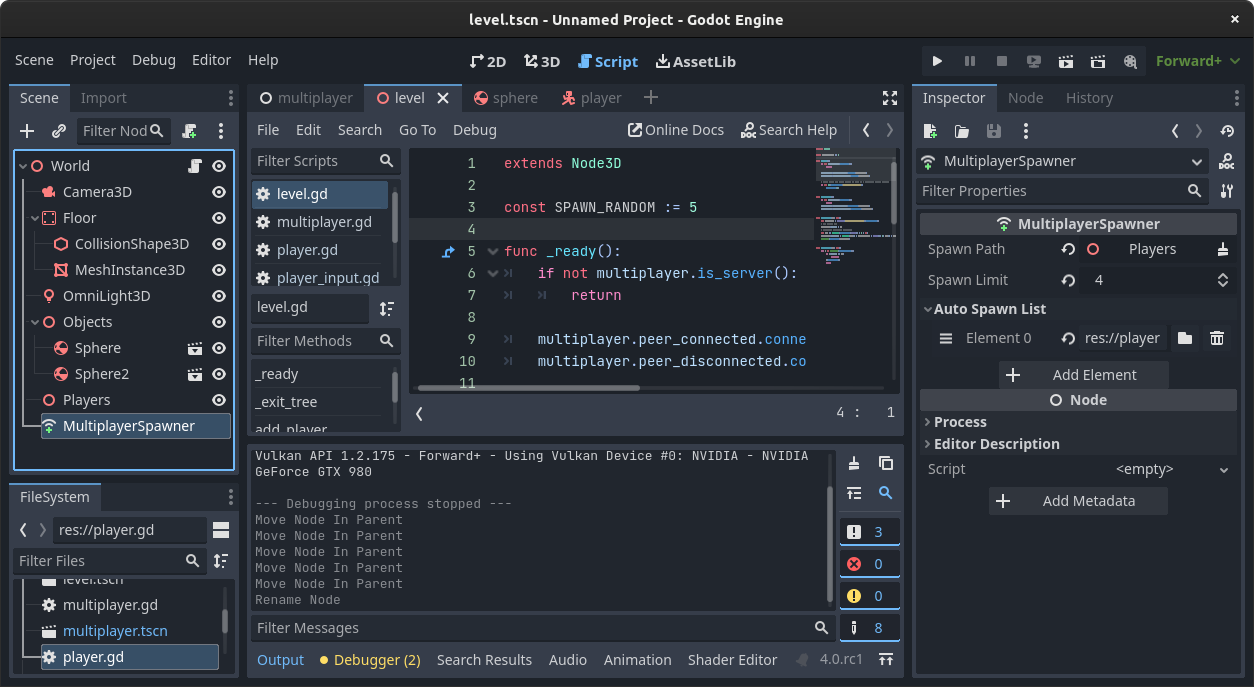
# level.gd
extends Node3D

const SPAWN_RANDOM := 5.0

func _ready():
	# We only need to spawn players on the server.
	if not multiplayer.is_server():
		return

	multiplayer.peer_connected.connect(add_player)
	multiplayer.peer_disconnected.connect(del_player)

	# Spawn already connected players.
	for id in multiplayer.get_peers():
		add_player(id)

	# Spawn the local player unless this is a dedicated server export.
	if not OS.has_feature("dedicated_server"):
		add_player(1)


func _exit_tree():
	if not multiplayer.is_server():
		return
	multiplayer.peer_connected.disconnect(add_player)
	multiplayer.peer_disconnected.disconnect(del_player)


func add_player(id: int):
	var character = preload("res://player.tscn").instantiate()
	# Set player id.
	character.player = id
	# Randomize character position.
	var pos := Vector2.from_angle(randf() * 2 * PI)
	character.position = Vector3(pos.x * SPAWN_RANDOM * randf(), 0, pos.y * SPAWN_RANDOM * randf())
	character.name = str(id)
	$Players.add_child(character, true)


func del_player(id: int):
	if not $Players.has_node(str(id)):
		return
	$Players.get_node(str(id)).queue_free()
We can now run the game and test that connecting to a host will correctly spawn the appropriate level and players, give us control of our character, and properly synchronize the object positions.
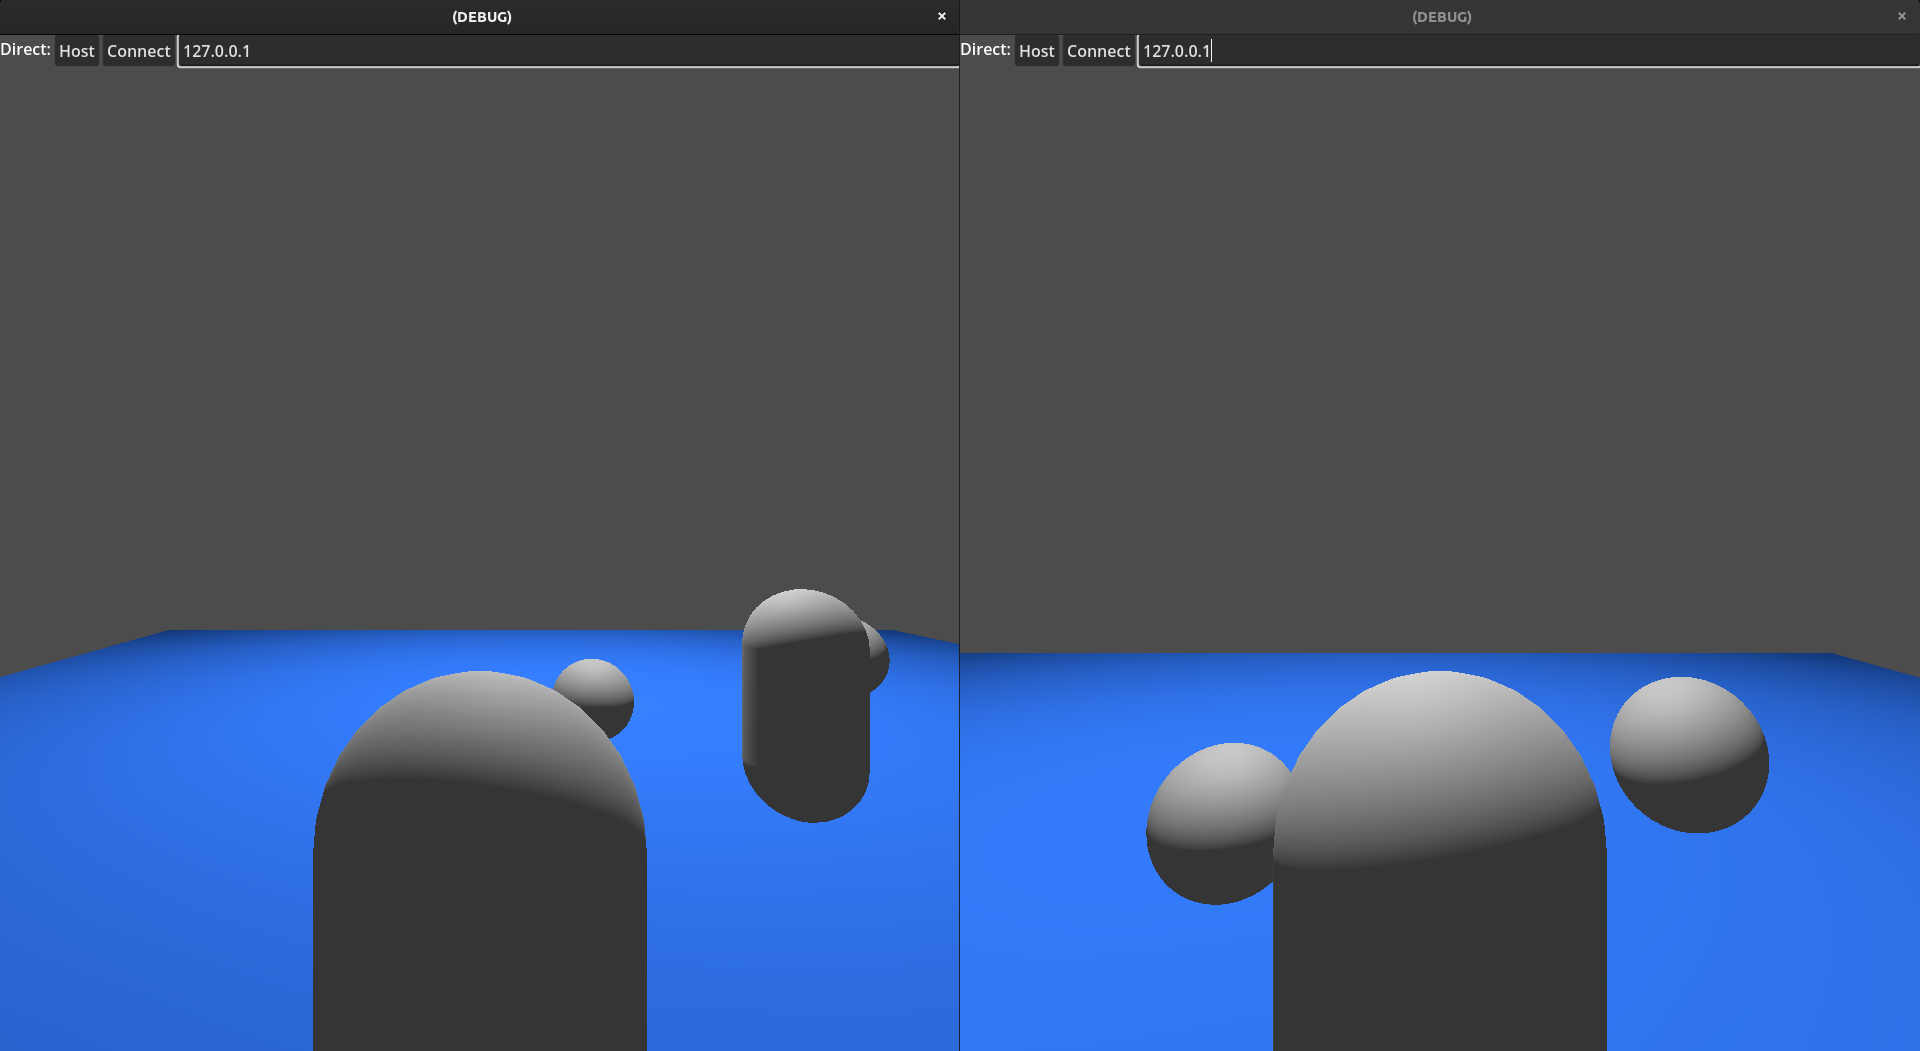
Here is the full project source, compatible with current 4.0 RC releases.
And that’s it for this long awaited introductory post to the new replication system. More advanced topics like bandwidth optimizations, spawning customized scenes and the visibility system will be discussed in a separate tutorial.
Reference work
Design proposals: #3359 and #3459.
Initial implementation: #55950.
And yes, as the top image hints we are adding multiplayer features to the TPS demo, so as always stay tuned for more ;).
